LaOS VisiCut User Guide
- Table of contents
- LaOS VisiCut User Guide
![]()
VisiCut is a stand-alone control program that accepts a file to be cut out from any 2D drawing program. It is made by Thomas Oster
VisiCut is not a drawing program: once you have sent your drawing to VisiCut you can no longer modify it, but still scale, rotate and move it on the laser-bed. In VisiCut you specify the settings for your cutter and for the material to cut. You can create
a whole set of material settings, so you do not have to enter them each time.
(LaOS can also be used with a printer driver inside a 2D drawing program like Inkscape, as described elsewhere in this wiki).
Installing VisiCut
Available for all platforms from https://amedeo.informatik.rwth-aachen.de/groups/visicut/wiki/a3a46/Download.html and install.
Selecting the HPC
- Open the VisiCut app and go to Edit -> Settings -> Manage Lasercutters... and select LAOS HPC. If there is none yet, click "+" and choose the LAOS driver.
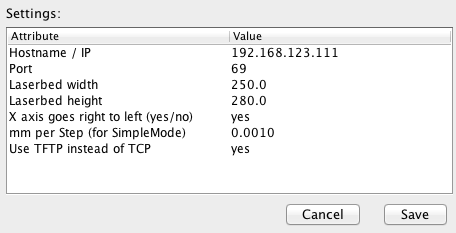
- Click Edit. A window appears with settings for the HPC.
- If you do not see the following values in the window edit them. If you want to use a different IP-address, enter it. And Save.
- On the VisiCut screen select LAOS HPC as lasercutter (If this is your only lasercutter, it will be selected automatically and no dropdown-box is shown).
First move
- If you're using Inkscape, it is quite convenient to install the Inkscape-Plugin (Extras -> Install Inkscape-Extension). After a restart of Inkscape, you can directly
run VisiCut on the selected elements by "Extensions -> Lasercut Path -> Open with VisiCut". - If you use another program, draw something - a square will be fine - in it, save it as a .svg file and open it with File -> Open in VisiCut. It will appear in the colored window.
- If you do not see it, click 'Everything => Cut' in the mapping box.

- You can move the square around and scale it. If you click two time, you can also rotate it. Right-Click on it to see other options. Position it some 10 cms from the left and top.
- Now leave the lid of your lasercutter open and click Execute. The job will be sent to the cutter.
- Neglect the pop-up window about closing the lid etc., just hit OK. The laser head should now draw the square.
Setting speed and power
- Before you can cut you need the set the power and the speed for the selected material.
- Check the ‘Edit settings before Executing” and hit ‘Execute' again.
- A window will pop up where you can edit the settings for your specific material.
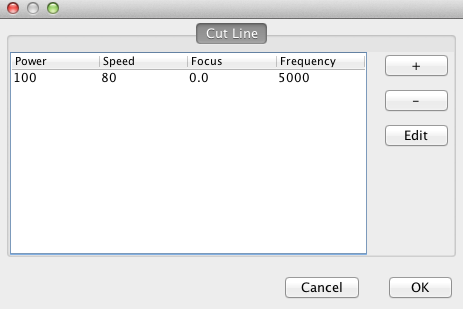
- OK will sent your job to the printer. And you can choose to keep this setting if you wish.
- Material settings for the LS3020 are in the (future) Laser Cuttings section
How to use VisiCut with Inkscape
This tutorial explains how to create SVG files with Inkscape that have different layers.
This second tutorial how to open files with cut and engrave layers with VisiCut.
The convention in LaOS is to use red thin lines for cutting and black thin lines for marking. A thin line is 1pt or thinner (pt = 0,353mm). Anything else will be rastered (engraved).
Printing directly from Inkscape
A plug-in to directly cut from Inkscape can be installed directly from VisiCut: "Extras -> Install Inkscape Extension" (Inkscape restart required). A Lasercut Path will be added under the Extensions tab.

Adding new material settings
Most likely that you will want to include materials in the Materials List with your own settings. Just click the "+"-Button next to the material-box to create a new material, or click the "+" button next
to the material thickness, to add a new thickness for the current material.
Updated by t-oster over 12 years ago · 33 revisions